Connecting a Mule application to an MCP Server is a core task for building modern, AI-driven integrations. While the MCP Connector makes this process straightforward, a few key details can make the difference between a smooth implementation and a frustrating debugging session.
Having gone through the process, I want to share the three most important lessons I learned to help you get it right the first time.
Lesson 1: Your Server URI Must Be Exact
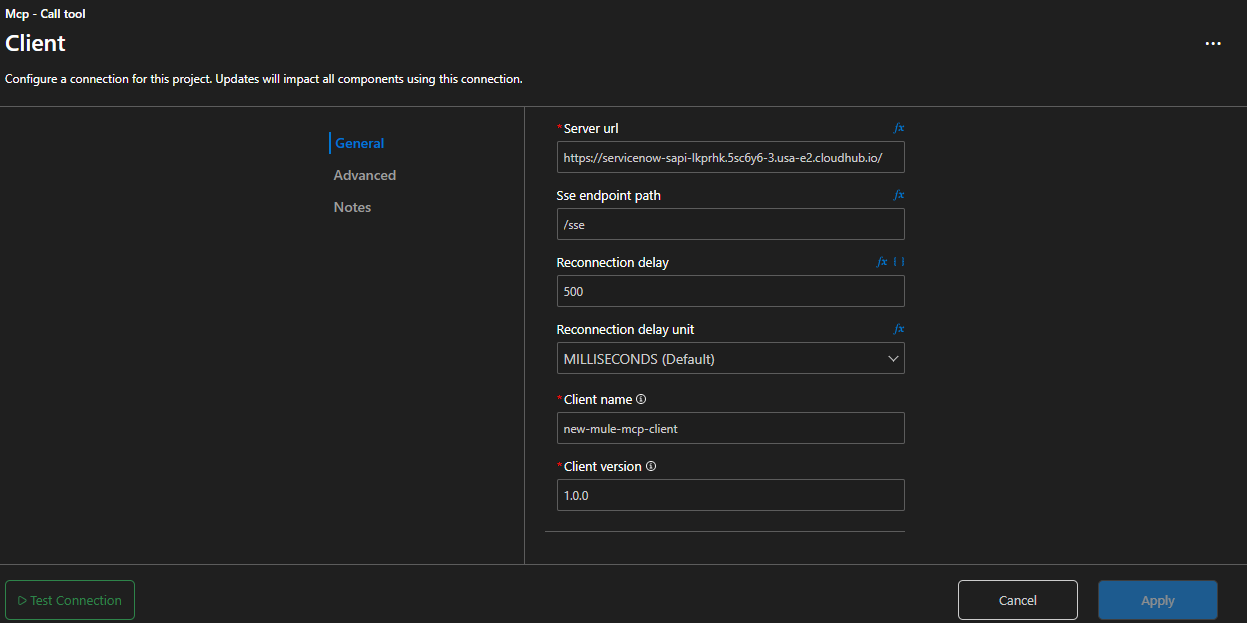
When you first set up the MCP Client configuration, your immediate instinct might be to just enter the hostname of your deployed MCP server. This is a common pitfall.
The Problem: The connection fails, and it’s not immediately obvious why.
The Solution: The Server URI field requires the full base URL of your deployed application, including the protocol (https://).
Think of it this way: you’re not just telling the client which server to talk to, but exactly where the MCP endpoint lives.

Pro Tip: Also, make sure to set a Client name. It will appear in your server logs, which is invaluable for tracing requests from different client applications.
Lesson 2: Arguments is for Your Payload, Not Request
Once your connection is configured, you’ll use the call-tool operation. In the configuration panel, you’ll see two fields that seem related to the request body: Arguments and Request (with additional properties).
The Problem: You send a payload, but the server doesn’t receive it, or you get unexpected behavior.
The Solution: Understand the distinction:
Arguments: This is where your actual request payload goes. You’ll typically use a DataWeave expression here to build the object your tool expects.Request (with additional properties): This is for sending additional metadata along with your request. It is not for the main payload. If you don’t have any metadata to send, you can simply leave this asnull.
Here’s the correct configuration in XML, showing the payload in the <mcp:arguments> tag:
<mcp:call-tool
    toolName="get-incident-details"
    doc:name="MCP Client - Call Tool"
    config-ref="Client">
    <mcp:arguments>
        <![CDATA[#[{
            sys_id: "abc"
        }]]]>
    </mcp:arguments>
</mcp:call-tool>
Lesson 3: The Response is Wrapped (And That’s a Good Thing!)
After your tool executes, the MCP Server sends a response. However, it doesn’t just send the raw data. Instead, the response is wrapped in a standard JSON object that provides crucial context.
The Problem: You can’t find your data in payload, or your flow doesn’t fail even when the server-side operation had an error.
The Solution: Know where to look inside the response object:
payload.isError: This boolean flag is your key to robust error handling. The client flow itself won’t throw an error. Instead, you should check if this flag istrueto determine if the tool execution failed.payload.result.content: This is where your actual data is located. Your DataWeave transformations should target this path to extract the response.
Here is an example of a full response object. Notice how the isError flag is at the top level, and the actual content is a stringified JSON nested inside result.content[0].text.
{
  "jsonrpc": "2.0",
  "id": "a76a9cb9-2",
  "result": {
    "content": [
      {
        "type": "text",
        "audience": [],
        "text": "{\n  \"sys_id\": \"abc\",\n  \"number\": \"INC0000001\",\n  \"short_description\": \"User unable to access CRM application\",\n  \"description\": \"The user 'Jane Doe' (User ID: F87B...) is reporting that she cannot log in to the CRM application. She is receiving a '500 Internal Server Error'. This is affecting her ability to perform daily tasks.\",\n  \"state\": \"2\",\n  \"assigned_to\": \"f1e2d3c4b5a69876543210fedcba9876\",\n  \"impact\": \"2\",\n  \"urgency\": \"2\",\n  \"category\": \"software\",\n  \"caller_id\": \"g1h2i3j4k5l6m7n8o9p0q1r2s3t4u5v6\",\n  \"opened_at\": \"2025-07-05T10:30:00Z\",\n  \"updated_at\": \"2025-07-05T11:00:00Z\"\n}"
      }
    ],
    "isError": false
  }
}
To access the actual JSON content, you need to parse the text field using the read function in DataWeave.
read(payload.result.content[0].text, 'application/json')
This expression will give you the final, usable JSON object:
{
  "sys_id": "abc",
  "number": "INC0000001",
  "short_description": "User unable to access CRM application",
  "description": "The user 'Jane Doe' (User ID: F87B...) is reporting that she cannot log in to the CRM application. She is receiving a '500 Internal Server Error'. This is affecting her ability to perform daily tasks.",
  "state": "2",
  "assigned_to": "f1e2d3c4b5a69876543210fedcba9876",
  "impact": "2",
  "urgency": "2",
  "category": "software",
  "caller_id": "g1h2i3j4k5l6m7n8o9p0q1r2s3t4u5v6",
  "opened_at": "2025-07-05T10:30:00Z",
  "updated_at": "2025-07-05T11:00:00Z"
}
✅ Summary
By keeping these three lessons in mind, you can avoid common issues and build reliable MCP client applications:
- Use the full, exact Server URI in your client configuration.
- Place your payload in the
Argumentsfield, not theRequestfield. - Inspect the wrapped response, using
isErrorfor error handling andresult.contentto access your data. Remember to parse the nested JSON string!
🚀 Continue Your Exploration!
Want to dive deeper? Check out these fantastic resources:
- Implementing an MCP Server in MuleSoft: https://ambassadorpatryk.com/posts/implementing-mcp-server-mulesoft/
- Official MuleSoft MCP Connector Documentation: https://docs.mulesoft.com/mcp-connector/latest/
- Unlocking AI’s Potential with MCP by Geert Hoste: https://integrationtrails.io/articles/career-development/unlocking-ais-potential-with-mcp
📘 Enjoyed this deep dive?
This is just a taste of what's coming! The platform I'm building, IntegrationTrails.io, is launching soon!
It's a place where you'll go beyond reading to truly boost your skills with practical guides, hands-on projects, and step-by-step learning experiences.
🚀 Be the first to know → Join the waitlist!